
LATEST NEWS
Press releases & Product news
LABTT Hardness Tester Indenter Replacement Guide
2025-06-03

The hardness tester is a key device for material hardness testing, and the indenter is the core component of the hardness tester. Its status is directly related to the accuracy of the test results. In actual use, the indenter will inevitably wear and crack, so it is particularly important to replace the indenter in a timely manner.
This article will introduce in detail the standard replacement process and precautions for the Vickers hardness tester indenter to help users ensure that the equipment is always in the best working condition. The following content refers to the key points of replacing the indenter of the Vickers hardness tester produced by LABTT.
01 - Necessity of replacing the indenter
Damage to the indenter will directly affect the accuracy of the hardness test, mainly manifested in:
Increased measurement deviation and poor data repeatability
Irregular indentation morphology, affecting measurement readings
Possible damage to the sample surface
Accelerated wear of other parts of the equipment
02 - Standardized replacement process
1. Preparation
Confirm that the power of the equipment is turned off
Prepare a new indenter of appropriate specifications
Prepare special tools (screwdriver)
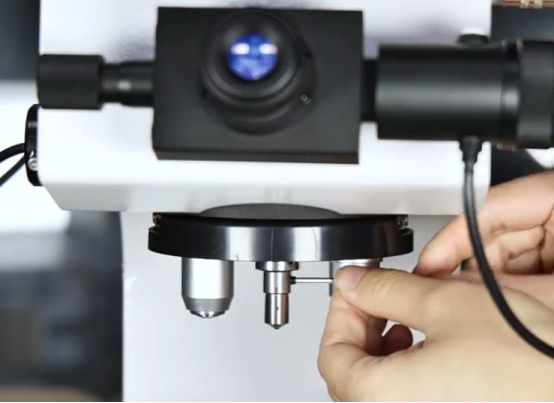
2. Remove the old indenter
Turn the hand wheel to lower the workbench to the lowest position
Turn the indenter to the front
Mark the connection between the indenter and the spindle
Use a screwdriver to loosen the fixing screw
Carefully remove the old indenter
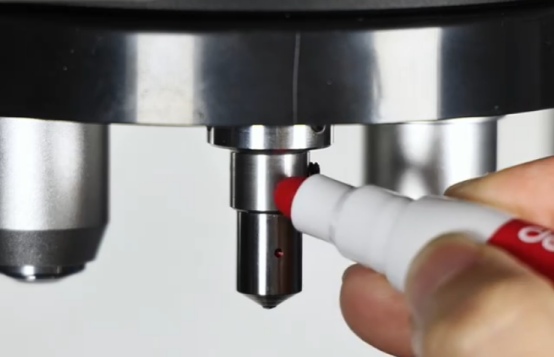
3. Install the new indenter
Clean the spindle mounting surface
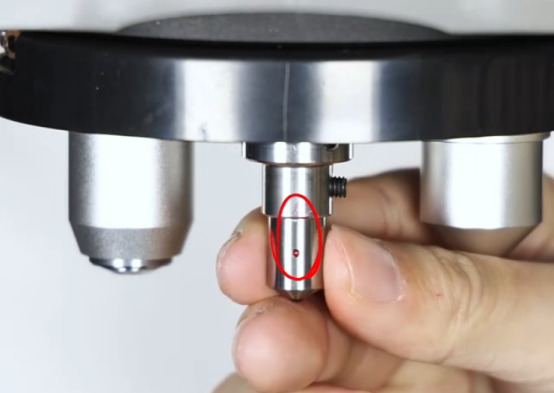
Align the new pressure head with the marked position
Make sure the red dot mark is aligned with the spindle mark
Tighten the top screw
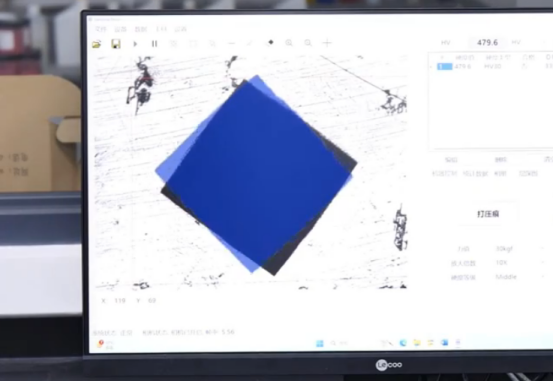
4. Debugging and calibration
Perform indentation test
Observe the indentation morphology
If the indentation is not correct, fine-tune the angle of the indenter
Repeat the test until the indentation meets the requirements
Finally, tighten the top screw again
03 - Precautions
Ensure the working environment is clean and prevent dust from entering
Tighten the top screw with moderate force to avoid damaging the thread
Equipment calibration is required after replacement
It is recommended to record the replacement time and indenter batch
04 - Maintenance suggestions
Regularly check the status of the indenter
Establish an indenter usage file
Equip with spare indenters
Perform equipment maintenance regularly
Through standardized indenter replacement operations and daily maintenance, the measurement accuracy of the hardness tester can be ensured and the service life of the equipment can be extended. At the same time, it is recommended that users establish a complete equipment maintenance system and perform regular professional maintenance to ensure the accuracy and reliability of the test data.
If you encounter any problems during the operation, please feel free to contact us and we will provide you with professional technical support.
PREVIOUS:

